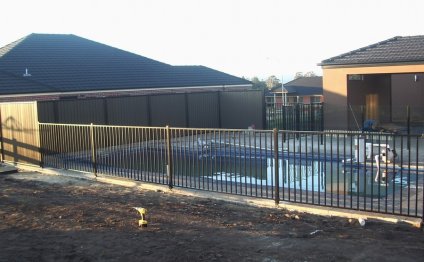
Pool Fencing Supplies
Your neighborhood fence specialist or installer may try to scare you by letting you know this not at all something that you can do by a home owner. Disregard what they tell you because when you yourself have a little bit of technical capability, you’ll be fine. Specialty Pool items offers 2 how to fence your inground children's pool. The very first option is our decorative aluminum Evolution fence as well as the second item is our mesh safety fence.
Do-it-yourself share fence installations is better than numerous specialist installs – if you focus on everything and all sorts of of dimensions tend to be accurate. After reviewing here information, you’ll have got all for the necessary precisely just how to put in a pool fence and start to become satisfied with the outcomes. By setting up pool fencing yourself you’ll save serious cash and should end up getting a significantly better finished project.
Before referring to the installation for your inground share fence, you can find two things to consider before you buy either our development Fence or any brand fence. Our Evolution aluminum fence comes as a 6ft wide area, and 48”, 54” or 60” tall – in a powder coated textured finish. Comparable in check out wrought iron, but way less pricey and no upkeep. The mesh protection fence is only obtainable in 48″ heights, which are 10 ft in total. Poles every 3-4 foot allow the mesh fence to pivot and curve a little easier as compared to 6′ broad aluminum fence parts.
Check with your local municipality for limitations, needs and any building codes put on your home by the neighborhood city. It is crucial that you know your local rule before you purchase and install your inground share fence. You can easily probably find the informative data on the local .gov website.
Before buying your fence make a drawing showing the positioning of area you intend to enclose, determine the full total linear measurement. Some people utilize chalk or tape string parts towards deck, to simulate the fence layout, then measure the entire period of the fence. This will tell you simply how much pool fence you want. Indicate area of gate or gates, in the event that you intend on having one, and note any transition locations between-deck levels. By doing this before starting to search, it helps make certain you built better contrast pool fence rates.
Evolution Aluminum Pool Fencing Installation:

- Article gap digger
- Core drill w/ auger bit
- Carpenter’s level
- Measuring tape
- Chalk or sequence range
Installing Aluminum Pool Fence We The Bottom
- Lay the work out-by stretching a line-out for a visual of where your fence will operate. You can make use of a chalk range, or spray paint to attract your line. Mark your post holes 6’ on center for a 6’ section. The gate post open positions should determine actual gate size.
- Dig the post holes roughly 2 ½’ deep (just beneath the frost line).
- String a line 4” more than the level of fence: 48” fence = 52” line level.
- Fill each post hole with concrete
- Always plumb and amount the articles and pickets even though the concrete is setting. You may have to brace your post while tangible sets if required.
- Hang your gate or gates regarding proper gate articles
- Attach any gate or post hardware or fence accessories
Note: if you'd like a partial fence part less than 6ft you can easily cut area to size. Swap the vertical rail rod gap drilling a 3/8” hole on center.
Products Needed:
- Utility knife
- Rotary hammer drill
- Extension cord
Installing Mesh Protection Fence In To The Pool Deck
- Initially determine located area of the fence but there are certain requirements you should utilize when determining where you should find your fence. Make sure the fence isolates the share location from all exits of the home. All sides of one's pool location should always be enclosed either your inground removable protection fence or any other permanent barrier such as for instance residence, block wall surface or fence. If you are staying away from the security fence as an overall total enclosure you need to tie into a current structure. The dwelling should be powerful adequate and high enough to not ever enable a child to find yourself in share. The fence must be the very least distance out of the share side to allow for correct upkeep while fence is in use.
- After identifying the location start with operating a chalk range around the section of fence, so you can put it to use as a guide to enable you to ensure your fence stays right.
- We offer the 4’x10’ part so because of this you intend to make use of the outdoors holes associated with template this is certainly provided, mark the four holes the first panel you can also make use of a tape measure and level holes 39 ¾” on center.
Drill, Baby, Drill!
Drill the holes into the tangible deck – per the Angle tips below:
- Holes for straight line of fencing must be drilled at 90 level angle.
- Holes for outdoors curve run of fencing should-be 2 to 3 degrees with top of pole angled out of the pool. Tighter curves may need up to 4 levels. Mark holes somewhat closer collectively to accommodate the material wrapping across the pole.
- Holes for inside run of fencing must certanly be 2-3 degrees aided by the top of the pole angled toward the pool. Tighter curves may need to 4 levels. Mark holes slightly further apart in order to make for slack into the fence because of less material wrapping across the pole.
Making use of these techniques permits the removable share fence to be pulled tight under stress to 90 levels.
- Use a store vac to eliminate any debris from holes and tap plastic deck sleeves into those holes, then install the first panel. If you don’t have a shop vac, make use of a garden hose to wash ou the hole. If your sleeves cannot fit you might have to redrill the holes, a little bigger round the top.
- For the next fence panel use the 2 nearest holes associated with template to mark the length between your panels, permitting precisely 3” on center.
- Repeat measures 3-6 until the holes tend to be drilled.
Mesh security fence panels tend to be 10ft long, however, if you will need an alternate size it can be shortened. Make sure the mesh fabric is tight and straight in all directions. Trim textile with scissors or a sharp energy knife but always leave a supplementary 4” above desired size. First, detach trim from the pole by utilizing a cordless screw driver, with a ¼” hex head little bit. Mark the specified size utilizing the chalk line, then fold the textile as well as under making the mesh fabric between the trim and pole. Re-fasten the screws along the chalk line.
In the end fence panels are installed they must be connected using hooks and eyes being provided. Install most of the vinyl post caps by placing a few falls of glue or PVC cement in the limits then slide all of them on post. You are able to develop a gate opening anywhere two panels link. Or, it is possible to install a self-closing and self-latching gate. If you're installing a pool fence gate, please see our installation manual for more information.
Now's time for you congratulate your self since you effectively setup either an aluminum pool fence or our mesh safety removable share fence. In the end of your perseverance it's time for you to sit back and luxuriate in a very good energizing beverage.
RELATED VIDEO


Share this Post
Related posts

Electric Showers
If you know how it feels to put up with the odd shower that does not hold a stable temperature and makes you slouch miserably…
Read More
Pool Maintenance Tips
Pretty soon swimming pool holders will face the annual problem: opening a backyard swimming pool for the summer period. The…
Read Morerandom posts
-
 Aqua Care Pool Service December 27, 2022
 -
 BBB Pool Care December 21, 2022
 -
 Pool scrub brush December 15, 2022
 -
 Pass out, drank December 9, 2022
 -
 Fencing Safety December 3, 2022
 -
 How to clear up cloudy pool water? November 27, 2022
 -
 Swimming Pool Safety Fences November 21, 2022
 -
 Child Pool November 15, 2022
 -
 Indoor swimming pool Maintenance November 9, 2022
 -
 Pool Turning green November 3, 2022
 -
 Advanced Pool Care October 28, 2022
 -
 Pool water treatment options October 22, 2022
 -
 Fresh water swimming Pools October 16, 2022
 -
 A pool is a great decision October 14, 2022